This blog is built using Hugo, a static site generator written in Go. The pattern is simple, code a site with templates and content locally, then build static pages and files to upload to a host of your choice. It makes for an extremely lightweight site, without the complexity of something like Wordpress. It also comes with similar bolt ons to the bigger site engines, which makes it a powerful choice.
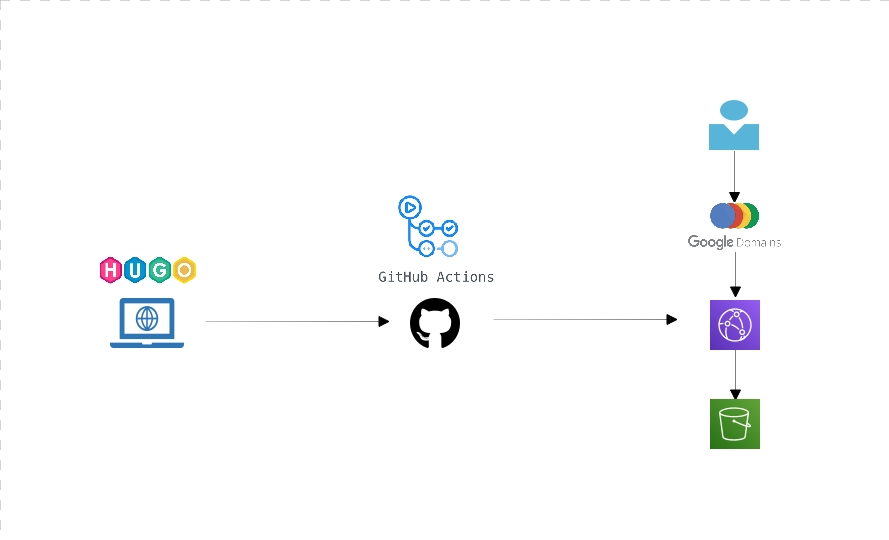
Its really simple to make your site locally, then upload it to your chosen hosting. I chose a more convoluted path, to try and test a few technologies that are new to me out. Once I’ve generated the static pages locally on my laptop, the whole source folder including the Hugo artifacts as well as the generated site is pushed to Github. This push to master, triggers a Github action which copies content to an AWS S3 bucket.
When a user requests a page, the domain registrars name servers (in this case Google Domains) point at an AWS Cloud Front deployment, which fronts the static pages. N.B. if you’re tempted to follow this pattern, be warned that there could be a 24 hour caching period employed by Cloudfront.
Most of this is already covered on the web, so I won’t repeat, but I will link to the articles I followed for anyone who finds this page.
-
Getting started with Hugo Hugo Quick Start
-
Github actions Github comes with some actions already coded up for you, but in this instance, the S3 one i found didn’t work. So I took the code and ran it as my own custom action. It looks like this:
name: Deploy site files

on:
  push:
    branches: [ master ]
  pull_request:
    branches: [ master ]

jobs:
  build:

    runs-on: ubuntu-latest

    steps:
    - uses: actions/checkout@v2

    - name: Copy package to S3 on AWS
      run: |
        export AWS_ACCESS_KEY_ID=${{ secrets.aws_access_key_id }}
        export AWS_SECRET_ACCESS_KEY=${{ secrets.aws_access_key }}
        export AWS_DEFAULT_REGION="eu-west-2"
        readonly SOURCE_DIR="public/"
        readonly SERVICE_NAME="<bucket-name>"
        readonly TARGET_DIR=""

        readonly user_id=$(aws sts get-caller-identity | jq -r '.Account')
        readonly s3_dir="s3://${SERVICE_NAME}/${TARGET_DIR}"

        echo "[Show valuables]"
        echo "AWS_DEFAULT_REGION: ${AWS_DEFAULT_REGION}"
        echo "user_id: ${user_id}"
        echo "s3_dir: ${s3_dir}"
        echo "SOURCE_DIR: ${SOURCE_DIR}"
        echo "SERVICE_NAME: ${SERVICE_NAME}"
        echo "TARGET_DIR: ${TARGET_DIR}"

        echo "[Show contents of ${SOURCE_DIR}]"

        ls ${SOURCE_DIR}

        echo "[Start copying ${SOURCE_DIR} to ${s3_dir}]"

        aws s3 cp ${SOURCE_DIR} ${s3_dir} --recursive

        echo "Complete!!"
You really only need to worry about adding variables for
- secrets.aws_access_key_id
- secrets.aws_access_key and to populate in the code above. Obviously the bucket needs to exist in advance.
#TODO: I really should have created my own action with the revised code above, for other people to use. One for another blog post.
- The final part of this puzzle, is to wire it all together. I followed this article, which is excellent. S3 website and SSL A couple of caveats:
- the article uses Route53 and I used Google Domains. After configuring the Cloudfront Distribution, grab the url for it and direct the www record to that (in google domains DNS). Also, add a synthetic record to bounce the naked domain to www.
- From reading various posts, Cloudfront can take some time to see your SSL cert. It might or might not have to be located in one of the US regions, although I waited 24 hours and it appeared to not matter. Plenty of blog posts say it helped them, with no concensus on the region.